Skip to content

huawei switchlerde ftp server aktif edilmesi ve basit konfigürasyonu

ağ güvenliği vb durumlar nedeniyle çok fazla tercih ettiğimiz bir yöntem olmasa da s5700 serisi switchler üzerinde gömülü bir ftp sunucusu vardır, bu sunucu ihtiyaç durumuna göre aktif edilebilir. veya ağ güvenlik yapımızı bunu da dikkate alarak yapılandırırsak sorun olmayacaktır.

bu ne gibi durumdalarda işimize yaracak diyecekseniz; switch güncellemelerin de, yedeklemelerin de vb oldukça fazla işimize yarayacak ve işimi kolaylaştırabilecektir. tabiki bu bahsettiğim durumlar için farklı yöntemlerde mevcuttur.

nqa icmp test

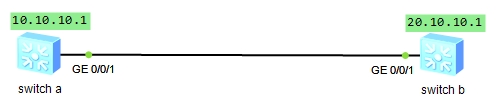
yukarıdaki şekilde basit bir ağ yapımız olsun. bu topolojide switchb – ftp server, switcha – ftp client olarak kullanılacaktır.

öncelikle switch üzerinden globalde ftp serverin aktif edilmesi gerekmektedir.

[switchb]ftp server enable 
Info: Succeeded in starting the FTP server.

sıra switch üzerinde bir kullanıcı adı ve şifresi tanımlamaya geldi. kullanıcı adı oluşturulduktan sonra bu kullanıcının hangi servisleri kullanabileceğini belirlememiz yani ftp servisi ile ilişkilendirmemiz gerekmektedir.

ftp sunucu ile ilgili olarak birde dizin belirlememiz gerekmektedir. örneğimizde flash: olarak seçilmiştir.

[switchb]aaa
[switchb-aaa]local-user kullanici password cipher sifre
Info: Add a new user.
[switchb-aaa]local-user kullanici service-type ftp
[switchb-aaa]local-user kullanici ftp-directory flash:

switchb üzerindeki yani ftp server ile ilgili temel yapılandırma en temel şekilde hazır hale geldi.. sıra sunucunun doğru olarak çalışıp çalışmadığı testini yapmaya geldi. switcha üzerinden switchb üzerine ftp ile bağlanalım.

öncelikle bize kullanıcı adı ve şifre sorulacaktır. “local-user kullanici password cipher sifre” satırı ile switch üzerinede kullanıcı adını : kullanici, şifresini ise sifre olarak belirlemiştik. sırası ile bunları girelim.

ftp 10.1.1.2
Trying 10.1.1.2 ...
Press CTRL+K to abort
Connected to 10.1.1.2.
220 FTP service ready.
User(10.1.1.2:(none)):kullanici
331 Password required for kullanici.
Enter password:
230 User logged in.

başarılı bir şekilde switchb üzerine bağlandık. şimdi basit bir ftp komutu ile test yapabiliriz.

[ftp]dir
200 Port command okay.
150 Opening ASCII mode data connection for *.
drwxrwxrwx   1 noone    nogroup         0 Jul 07 21:48 src
drwxrwxrwx   1 noone    nogroup         0 Jul 07 21:48 compatible
226 Transfer complete.

[ftp]

huawei 5700 serisi switchlerde nqa (network quality analysis) kullanımı – icmp testi

nqa icmp test

Network Quality Analysis (NQA) yapısını ve işleyisini anlamak adına yukarıda şekilde basit bir topolojimi olduğunu düşünülelim. burada testimizi switch a üzerinden yapacağız.. switcha ve switchb yi buna konfigüre edeceğiz. ( switch konfiglerinin paralel olarak yapıldığını unutmamak gerekli )

konfigürasyon moda girerek switch isimlendirmesini yapalım.

system-view 
Enter system view, return user view with Ctrl+Z.
[Huawei]sysname switcha

switchler üzerinde vlan 10 onu oluşturarak ip bilgilerinizi girelim.

[switcha]vlan batch 10
[switcha]interface Vlanif 10
[switcha-Vlanif10]ip address 10.1.1.1 24

sırada switchlerimizde uplink olarak kullandığımız portların konfigürasyonunu yapmaya geldi. hybrid modda untagged modda gerekli yapılandımayı yapalım

[switcha]interface GigabitEthernet 0/0/1
[switcha-GigabitEthernet0/0/1]port hybrid pvid vlan 10	
[switcha-GigabitEthernet0/0/1]port hybrid untagged vlan 10

buraya kadar herşey tamam şimdi nqa konfigürasyonunu yapmaya geldi.

bu örneğimizde testimizi icmp olarak yapacağız. bununla ilgili olarak nqa tanımlarınızı aşagıdaki şekilde oluştururuz. test-type burada yapılacak test modunu belirlemektedir. destination-address ise testin yapılacağı ipdir.

[switcha]nqa test-instance admin icmp
[switcha-nqa-admin-icmp]test-type icmp 
[switcha-nqa-admin-icmp]destination-address ipv4 10.1.1.2

gerekli konfigürasyonumuz yapmış olduk. sıra testi başlatıp sonuçlarını göremeye geldi. öncelikli olarak start now ile testi başlatıyoruz ve sonrasında display edebiliyoruz. stop ile testi durdurabiliriz.

[switcha-nqa-admin-icmp]start now 
[switcha-nqa-admin-icmp]display nqa results test-instance admin icmp
 
 NQA entry(admin, icmp) :testflag is active ,testtype is icmp 
  1 . Test 1 result   The test is finished
   Send operation times: 3              Receive response times: 3          
   Completion:success                   RTD OverThresholds number: 0       
   Attempts number:1                    Drop operation number:0            
   Disconnect operation number:0        Operation timeout number:0         
   System busy operation number:0       Connection fail number:0           
   Operation sequence errors number:0   RTT Status errors number:0         
   Destination ip address:10.1.1.2                                       
   Min/Max/Average Completion Time: 10/40/26                             
   Sum/Square-Sum  Completion Time: 80/2600                              
   Last Good Probe Time: 2014-07-07 21:56:56.8                           
   Lost packet ratio: 0 %      
[switcha-nqa-admin-icmp]

yukarıda testin başarı olarak geçtiğini ve paket kaybı olmadığını gördük. çıktılarda farklı görebilmekte ve yapının masıl işlediğini görmek adına hedef ip adresini ağda olmayan bir ip ile değiştirelim ve test sonuçlarına yeniden bakalım.

aşagıdaki çıktıdan görüldüğü üzere 1. testimi başarı 2. testimiz ise başarısız olarak gerçekleşmiştir.. daha sonraki yazılarda nqa nın daha kapsamlı olarak nasıl daha işe yarar şekilde kullanılacağına ilişkin örneklere bakabilmek dileğiyle.

[switcha-nqa-admin-icmp]destination-address ipv4 10.1.1.3
[switcha-nqa-admin-icmp]start now 
[switcha-nqa-admin-icmp]display nqa results test-instance admin icmp
 NQA entry(admin, icmp) :testflag is inactive ,testtype is icmp 
  1 . Test 1 result   The test is finished
   Send operation times: 3              Receive response times: 3          
   Completion:success                   RTD OverThresholds number: 0       
   Attempts number:1                    Drop operation number:0            
   Disconnect operation number:0        Operation timeout number:0         
   System busy operation number:0       Connection fail number:0           
   Operation sequence errors number:0   RTT Status errors number:0         
   Destination ip address:10.1.1.2                                       
   Min/Max/Average Completion Time: 10/40/26                             
   Sum/Square-Sum  Completion Time: 80/2600                              
   Last Good Probe Time: 2014-07-07 21:56:56.8                           
   Lost packet ratio: 0 %      
  2 . Test 2 result   The test is finished
   Send operation times: 3              Receive response times: 0          
   Completion:failed                    RTD OverThresholds number: 0       
   Attempts number:1                    Drop operation number:0            
   Disconnect operation number:0        Operation timeout number:3         
   System busy operation number:0       Connection fail number:0           
   Operation sequence errors number:0   RTT Status errors number:0         
   Destination ip address:10.1.1.3                                       
   Min/Max/Average Completion Time: 0/0/0                                
   Sum/Square-Sum  Completion Time: 0/0                                  
   Last Good Probe Time: 0000-00-00 00:00:00.0                           
   Lost packet ratio: 100 %    
[switcha-nqa-admin-icmp]


huawei 5700 serisi switchlerde lldp konfigürasyonu

lldp config

huawei serisi switchlerde basit lldp konfigürasyonu nasıl yapılır. incelemeye çalışalım.

[switch_a]display lldp local 
Error: Global LLDP is not enabled.

bu bize lldp nin globalde aktif edilmesi gerektiğini söylüyor.

[switch_a]lldp enable 
Info: Global LLDP is enabled successfully.

display lldp local komutunu tekrar çalıştıralım..

[switch_a]display lldp local 

System information
--------------------------------------------------------------------------
Chassis type   :macAddress 
Chassis ID     :4c1f-cc60-60d8
System name    :switch_a
System description  :S5700-28C-HI 
Huawei Versatile Routing Platform Software 
 VRP (R) software,Version 3.30 (S5700 V200R001C00) 
 Copyright (C) 2007 Huawei Technologies Co., Ltd.
System capabilities supported   :bridge  
System capabilities enabled     :bridge  
LLDP Up time   :2014/7/6 20:0:17

MED system information
--------------------------------------------------------------------------
Device class   :Network Connectivity
(MED inventory information of master board)
HardwareRev       :VER B
FirmwareRev       :NA
SoftwareRev       :Version 3.30 V200R001C00
SerialNum         :NA
Manufacturer name :HUAWEI TECH CO., LTD
Model name        :NA
Asset tracking identifier :NA

System configuration
--------------------------------------------------------------------------
LLDP Status                     :enabled             (default is disabled)
LLDP Message Tx Interval        :30                  (default is 30s)     
LLDP Message Tx Hold Multiplier :4                   (default is 4)       
LLDP Refresh Delay              :2                   (default is 2s)      
LLDP Tx Delay                   :2                   (default is 2s)      
LLDP Notification Interval      :5                   (default is 5s)      
LLDP Notification Enable        :enabled             (default is disabled)
Management Address              :

Remote Table Statistics:
--------------------------------------------------------------------------
Remote Table Last Change Time   :0 days, 0 hours, 0 minutes, 0 seconds           

Remote Neighbors Added          :0     
Remote Neighbors Deleted        :0     
Remote Neighbors Dropped        :0     
Remote Neighbors Aged           :0     
Total Neighbors                 :0     

Port information:
--------------------------------------------------------------------------

Interface GigabitEthernet0/0/1:
LLDP Enable Status       :enabled             (default is disabled)
Total Neighbors          :0

Port ID subtype     :interfaceName 
Port ID             :GigabitEthernet0/0/1 
Port description    :

şeklinde devam eden bize bir çıktı verecektir. bundan sonra lldp management adresinin eklenmesi ve uplinke ait port tanımlarının yapılması gerekli. burada temel olarak loopback0 ile aynı yaparız.

[switch_a]lldp management-address 10.10.10.1
Error: The IP Address does not exist.

[switch_a]interface LoopBack0
[switch_a-LoopBack0]ip address 10.10.10.1 255.255.255.255


[switch_a]lldp management-address 10.10.10.1
Info: Setting management address successfully.


[switch_a]interface  GigabitEthernet 0/0/1
[switch_a-GigabitEthernet0/0/1]bpdu enable 
[switch_a-GigabitEthernet0/0/1]q

bundan sonra lldp local komutunu çıktısını incelersek management ip artık yer aldığı görülecektir.

[switch_a]display lldp local 

System information
--------------------------------------------------------------------------
Chassis type   :macAddress 
Chassis ID     :4c1f-cc60-60d8
System name    :switch_a
System description  :S5700-28C-HI 
Huawei Versatile Routing Platform Software 
 VRP (R) software,Version 3.30 (S5700 V200R001C00) 
 Copyright (C) 2007 Huawei Technologies Co., Ltd.
System capabilities supported   :bridge  
System capabilities enabled     :bridge  
LLDP Up time   :2014/7/6 20:0:17

MED system information
--------------------------------------------------------------------------
Device class   :Network Connectivity
(MED inventory information of master board)
HardwareRev       :VER B
FirmwareRev       :NA
SoftwareRev       :Version 3.30 V200R001C00
SerialNum         :NA
Manufacturer name :HUAWEI TECH CO., LTD
Model name        :NA
Asset tracking identifier :NA

System configuration
--------------------------------------------------------------------------
LLDP Status                     :enabled             (default is disabled)
LLDP Message Tx Interval        :30                  (default is 30s)     
LLDP Message Tx Hold Multiplier :4                   (default is 4)       
LLDP Refresh Delay              :2                   (default is 2s)      
LLDP Tx Delay                   :2                   (default is 2s)      
LLDP Notification Interval      :5                   (default is 5s)      
LLDP Notification Enable        :enabled             (default is disabled)
Management Address              :IP: 10.10.10.1  

Remote Table Statistics:
--------------------------------------------------------------------------
Remote Table Last Change Time   :0 days, 0 hours, 0 minutes, 0 seconds           

Remote Neighbors Added          :0     
Remote Neighbors Deleted        :0     
Remote Neighbors Dropped        :0     
Remote Neighbors Aged           :0     
Total Neighbors                 :0     

Port information:
--------------------------------------------------------------------------

lokal kısım ile ilgili yapacaklarımız bitti. uzak uç ile ilgili bilgilere bakalım.. bunun için lldp neighbor komutunu kullanıyoruz. aşagıdaki çıktıdan görüldüğü üzere interfacelerde herhangi bir cihaz alğılanmamış durumda.

[switch_a]display lldp neighbor 
GigabitEthernet0/0/1 has 0 neighbors

GigabitEthernet0/0/2 has 0 neighbors

GigabitEthernet0/0/3 has 0 neighbors

GigabitEthernet0/0/4 has 0 neighbors

GigabitEthernet0/0/5 has 0 neighbors

uç cihaz konfigürasyonlarınıda yaptıktan sonra tekrar bakacak olursak interface karşı uca ati bilgilerin geldiği görülecektir.

[switch_a]display lldp neighbor 
GigabitEthernet0/0/1 has 1 neighbors:


Neighbor index : 1
Chassis type   :macAddress 
Chassis ID     :4c1f-cccc-3a18 
Port ID type   :interfaceName 
Port ID        :GigabitEthernet0/0/1
Port description    :NA
System name         :switch_b
System description  :S5700-28C-HI 
Huawei Versatile Routing Platform Software 
 VRP (R) software,Version 3.30 (S5700 V200R001C00) 
 Copyright (C) 2007 Huawei Technologies Co., Ltd.
System capabilities supported   :bridge 
System capabilities enabled     :bridge 
Management address type  :ipV4
Management address       : 20.10.10.1  
Expired time   :112s


Port VLAN ID(PVID)  :1
VLAN name of VLAN  1: VLAN1
Protocol identity   :STP STP LACP EthOAM CFM 

Auto-negotiation supported    :No 
Auto-negotiation enabled      :No
OperMau   :speed(0)/duplex(Half)

Power port class         :PD 
PSE power supported      :No 
PSE power enabled        :No 
PSE pairs control ability:No 
Power pairs              :Unknown 
Port power classification:Unknown

Link aggregation supported:Yes 
Link aggregation enabled :No 
Aggregation port ID      :0 
Maximum frame Size       :9216

EEE support              :No 
Transmit Tw              :0 
Receive Tw               :0 
Fallback Receive Tw      :0 
Echo Transmit Tw         :0 
Echo Receive Tw          :0

MED Device information             
Device class   :Network Connectivity

HardwareRev       :VER B
FirmwareRev       :NA
SoftwareRev       :Version 3.30 V200R001C00
SerialNum         :NA
Manufacturer name :HUAWEI TECH CO., LTD
Model name        :NA
Asset tracking identifier :NA

Media policy type   :Voice 
Unknown Policy      :Defined 
VLAN tagged         :Yes 
Media policy VlanID      :0 
Media policy L2 priority :5 
Media policy Dscp        :46

Power Type               :Unknown 
PoE PSE power source     :Unknown 
Port PSE Priority        :Unknown 
Port Available power value:2
GigabitEthernet0/0/2 has 0 neighbors

GigabitEthernet0/0/3 has 0 neighbors

GigabitEthernet0/0/4 has 0 neighbors

GigabitEthernet0/0/5 has 0 neighbors

huawei – iki switch arasi statik route

elimizde s5700 serisi iki adet huawei switch olduğunu düşünelim. switchlerimizi aşağıdaki topolojiye uygun olarak fiziksel bağlantılarını gerçekleştirelim.


basit_switch_ornek1

fiziksel bağlantıların doğru olup olmadığını “diplay interface brief” ile kontrol edebilirsiniz. bu komutun çıktısı aşağıdakine benzer olacaktır. her iki switchde gerekli bağlantıları kontrol ettikten sonra en temel tanımlamalarımızı yapmaya başlayalım.

bu örnekte ofis_a ve ofis_b switchine gerekli tanımlamaları eş zamanlı girildiği belirtmekte fayda var.

InUti/OutUti: input utility/output utility
Interface                   PHY   Protocol InUti OutUti   inErrors  outErrors
GigabitEthernet0/0/1        up    up          0%     0%          0          0
GigabitEthernet0/0/2        up    up          0%     0%          0          0
GigabitEthernet0/0/3        down  down        0%     0%          0          0
GigabitEthernet0/0/4        down  down        0%     0%          0          0
GigabitEthernet0/0/5        down  down        0%     0%          0          0

cihazlarımızı karıştırmamak için öncelikle cihazlarımıza birer ad verelim. bunun için “sysname sistem_adi” komutu kullanılacaktır.

system-view 
Enter system view, return user view with Ctrl+Z.	
[Huawei]sysname ofis_b
[ofis_b]

switch yönetimi ve 10.0.0.1/24 için 100 vlanı kullanacağız. ofis_b switch için gerekli tanımlamaları adım adım girelim.

vlan 100 i switch üzerine ekleyerek ip adresini ekleyelim

[ofis_b]vlan batch 100
[ofis_b]interface Vlanif 100
[ofis_b-Vlanif100]ip address 10.0.0.2 24
[ofis_b-Vlanif100]display this
#
interface Vlanif100
 ip address 10.0.0.2 255.255.255.0
#
return
[ofis_b-Vlanif100]quit

şimdi gerekli statik route u yazalım.

[ofis_b]ip route-static 0.0.0.0 0.0.0.0 10.0.0.1

route için gerekli kontrolleri yapalım..

[ofis_b]display ip interface brief 
*down: administratively down
^down: standby
(l): loopback
(s): spoofing
The number of interface that is UP in Physical is 2
The number of interface that is DOWN in Physical is 2
The number of interface that is UP in Protocol is 1
The number of interface that is DOWN in Protocol is 3

Interface                         IP Address/Mask      Physical   Protocol  
MEth0/0/1                         unassigned           down       down      
NULL0                             unassigned           up         up(s)     
Vlanif1                           unassigned           up         down      
Vlanif100                         10.0.0.2/24          down       down  
   

yukarıda 100 vlanın eklendiğini ve 10.0.0.2/24 in fiziksel ve protokol olarak down olduğu görülmekte. yani sıra fiziksel arayüz tanımlamaları yapmaya geldi demek.

[ofis_b]nterface GigabitEthernet 0/0/1
[ofis_b-GigabitEthernet0/0/1]description ofis_a—ofis_b
[ofis_b-GigabitEthernet0/0/1]port link-type trunk
[ofis_b-GigabitEthernet0/0/1]port trunk allow-pass 100
[ofis_b-GigabitEthernet0/0/1]quit


0/0/1 portunu trunk mode olarak ayarladık ve 100 vlanı bu porta tanımladık. şimdi gerekli kontrolleri yapalım.


[ofis_b]display ip interface brief 
*down: administratively down
^down: standby
(l): loopback
(s): spoofing
The number of interface that is UP in Physical is 2
The number of interface that is DOWN in Physical is 2
The number of interface that is UP in Protocol is 1
The number of interface that is DOWN in Protocol is 3

Interface                         IP Address/Mask      Physical   Protocol  
MEth0/0/1                         unassigned           down       down      
NULL0                             unassigned           up         up(s)     
Vlanif1                           unassigned           up         down      
Vlanif100                         10.0.0.2/24          up         up   
  

buradan görüldüğü üzere 100 vlani fiziksel ve protokol olarak up görülmektedir.

sıra geldi en temel kontrole

[ofis_b-GigabitEthernet0/0/1]ping 10.0.0.1
  PING 10.0.0.1: 56  data bytes, press CTRL_C to break
    Reply from 10.0.0.1: bytes=56 Sequence=1 ttl=255 time=50 ms
    Reply from 10.0.0.1: bytes=56 Sequence=2 ttl=255 time=30 ms
    Reply from 10.0.0.1: bytes=56 Sequence=3 ttl=255 time=50 ms
    Reply from 10.0.0.1: bytes=56 Sequence=4 ttl=255 time=50 ms
    Reply from 10.0.0.1: bytes=56 Sequence=5 ttl=255 time=10 ms

ofis_a swith konfigürasyonu

ofis_b swith konfigürasyonu

Back To Top