Skip to content

siremis kurulumu

https://ferhatcicek.com/siremis/ yazısında siremis hakkında temel bilgileri blogumda paylaşmıştım. kamailio kullanıyorsanız siremis olmazsa olmazınızdır. sistemizde kamaili nun kurulu olduğunu düşünerek siremisi nasıl kuracağımızı basitçe anlatmaya başlayalım. öncelikle

http://siremis.asipto.com/pub/downloads/siremis/

adresinden güncel sürümü indirelim. şu an güncel sürüm 4.2. indirdiğiz yazılımı uygun bir noktada açalım.

root@cicek:/var/www# tar zxvf siremis-4.2.0.tgz 

açılan dizin içine girerek apache konfigürasyon dosyalarında eklemiz gereken satırları oluşturacak olan make komutunu çalıştıralım. burada kullandığınız apache sürümü önemli. ben sistemimde 2.4 sürümünü kullandığım için apache24-conf parametresini kullandım.

root@cicek:/var/www# cd siremis-4.2.0/
root@cicek:/var/www/siremis-4.2.0# ls
ChangeLog  Makefile  misc  openbiz  README  siremis
root@cicek:/var/www/siremis-4.2.0# make apache24-conf
# siremis apache conf snippet ...

	Alias /siremis "/var/www/siremis-4.2.0/siremis"
	<Directory "/var/www/siremis-4.2.0/siremis">
		Options Indexes FollowSymLinks MultiViews
		AllowOverride All
		Require all granted
		<FilesMatch "\.xml$">
			Require all denied
		
		<FilesMatch "\.inc$">
			Require all denied


bu kodu apachenin 000-default.conf konfigürasyon dosyası içine ekliyoruz. ben şu an debian kullanıyorum ve bu dosyanın yeri /etc/apache2/sites-available/000-default.conf şeklinde.

root@cicek:/etc/apache2/sites-available# nano /etc/apache2/sites-available/000-default.conf 

gerekli değişiklik yapıldıktan sonra apache yi yeniden başlatıyoruz.

root@cicek:/etc/apache2/sites-available# service apache2 restart 

bundan sonra gerekli erişim ve yetki ayarlamalarını yapılabilmesi için prepare ve chown parametrelerini işletiyoruz.

root@cicek:/var/www/siremis-4.2.0# make prepare
updating htaccess file...
updating app.inc file...
creating folders...
done

root@cicek:/var/www/siremis-4.2.0# make chown
changing onwner to www-data:www-data ...
chown -R www-data:www-data .

şimdi internet tarayıcımızdan http://locahost/siremis/ adresine erişim testi yapalım. erişim testi başarılı ise sıra siremis için mysql kullanıcı erişim ayarlarının yapılmasına geldi.

root@cicek:/var/www/siremis-4.2.0# mysql  -u root -p 
Enter password: 

mysql> GRANT ALL PRIVILEGES ON siremis.* TO siremis@localhost IDENTIFIED BY 'siremisrw';
Query OK, 0 rows affected (0.05 sec)

kanailio nunda tabiki mysql eklentisinin aktif edilmiş ve ayarlarının yapılmış olması gerekmektedir. eğer yok ise kuralım ve kurulum sonrası /etc/kamailio/kamctlrc dosyası üzerinde mysql aktif eder mysql ile ilgili ayarlarıda yapalım.

root@cicek:/etc/kamailio# apt-get install kamailio-mysql-modules 
root@cicek:/etc/kamailio# ls
dictionary.kamailio    kamailio-basic.cfg  kamctlrc
kamailio-advanced.cfg  kamailio.cfg        pi_framework.xml
root@cicek:/etc/kamailio# nano kamctlrc 
DBENGINE=MYSQL
DBHOST=localhost
DBNAME=kamailio
DBRWUSER="kamailio"
DBRWPW="kamailiorw"
DBROUSER="kamailioro"
DBROOTUSER="root"

sonrasında ysql veri tabanı ile ilgili işlemlerin yapılması için kamailionun kamdbctl aracını çalıştıralım

root@cicek:/etc/kamailio# kamdbctl create
MySQL password for root: 
INFO: test server charset
INFO: creating database kamailio ...
INFO: granting privileges to database kamailio ...
INFO: creating standard tables into kamailio ...
INFO: Core Kamailio tables succesfully created.
Install presence related tables? (y/n): y
INFO: creating presence tables into kamailio ...
INFO: Presence tables succesfully created.
Install tables for imc cpl siptrace domainpolicy carrierroute
		userblacklist htable purple uac pipelimit mtree sca mohqueue
		rtpproxy? (y/n): y
INFO: creating extra tables into kamailio ...
INFO: Extra tables succesfully created.
Install tables for uid_auth_db uid_avp_db uid_domain uid_gflags
		uid_uri_db? (y/n): y
INFO: creating uid tables into kamailio ...
INFO: UID tables succesfully created.
root@cicek:/etc/kamailio# 

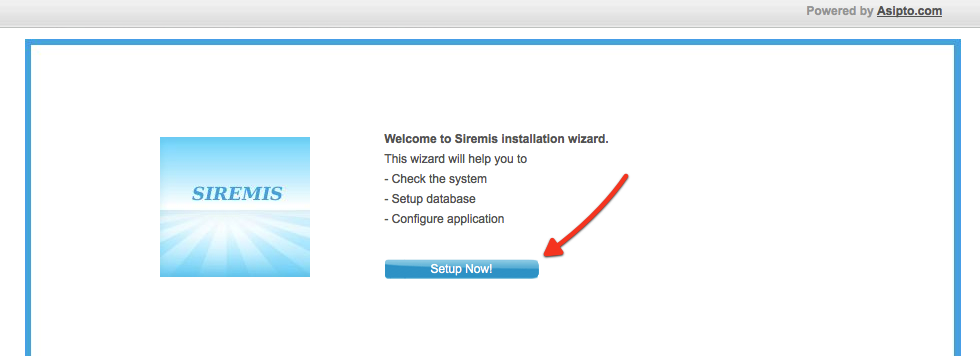
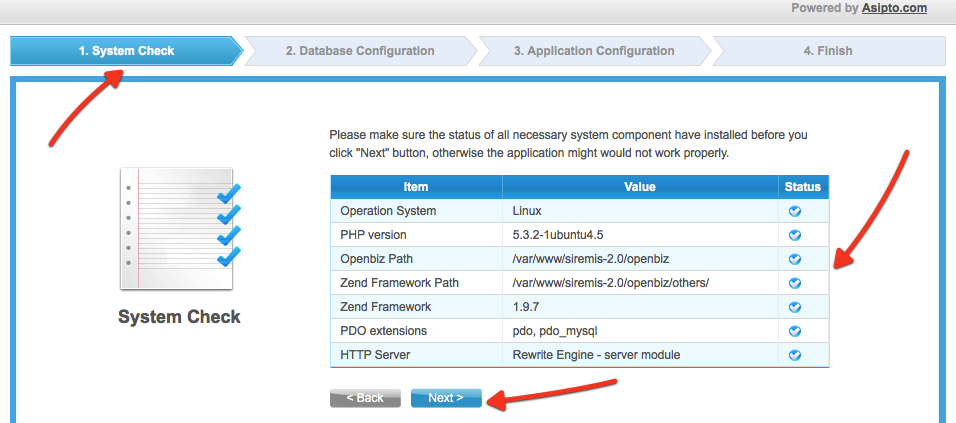
buraya kadar sorunsuz olarak geldiyseniz sıre siremisin web arayüzünden kurulumu tamamlamaya geldi.

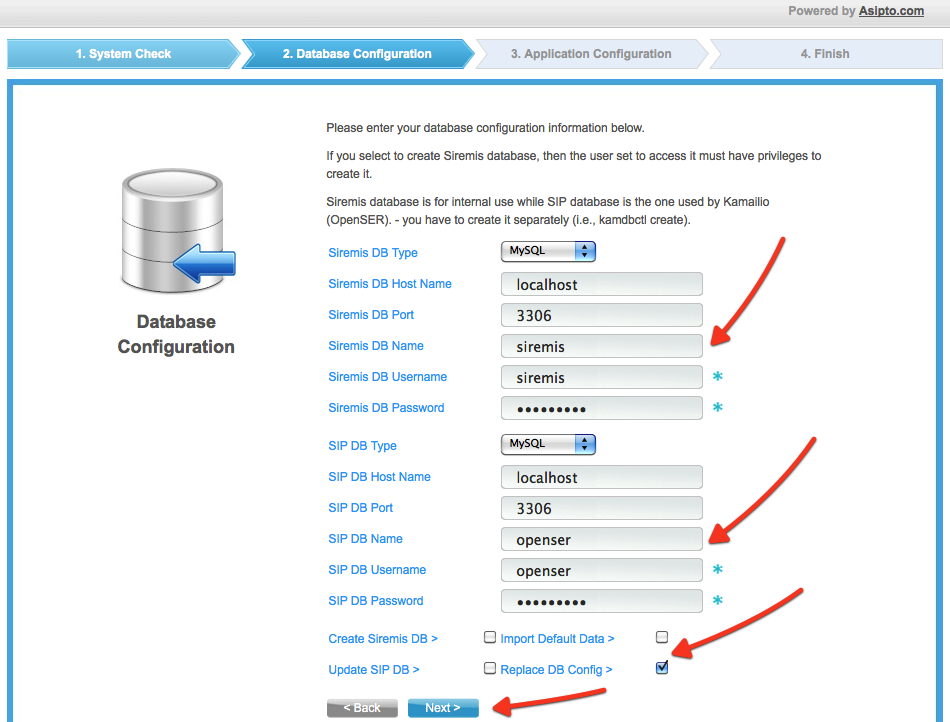
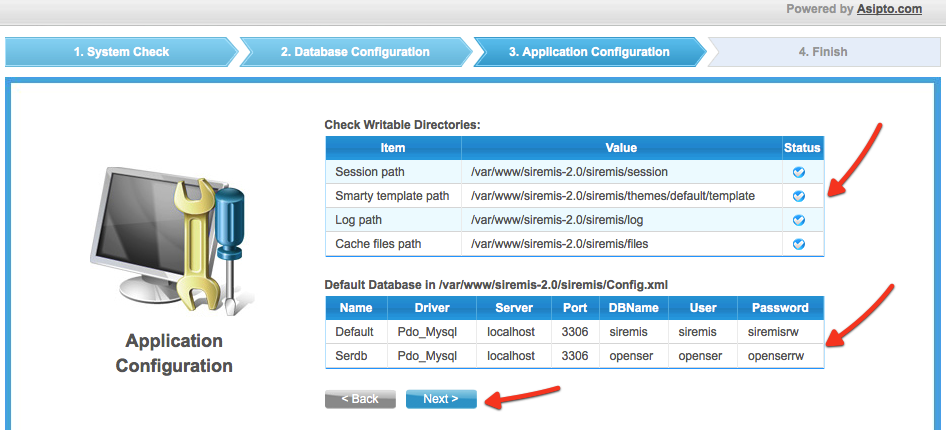
http://locahost/siremis/ adresinden aşagıdaki ekran görüntülerinde yer aldığı gibi gerekli verileri girerek tamamlıyoruz.

siremis1

siremis2

siremis3

siremis4

siremis5

siremis6

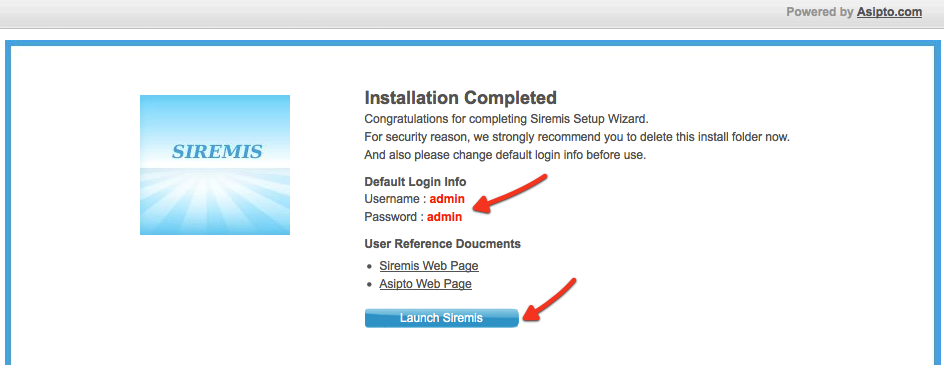
siremis artık kullanıma hazırdır. ancak

[{"target":"ERROR","content":"
\n[2015-07-03 10:01:48 (GMT)] An exception occurred while executing this script:
\nError message: #8192, Non-static method BizSystem::getConfiguration() should not be called statically, assuming $this from incompatible context< \/font>
\nScript name and line number of error: \/var\/www\/siremis-4.2.0\/openbiz\/bin\/data\/BizDataObj_Abstract.php:268< \/font>
\n

hatasını veya benzer hataları alacak olursanız https://github.com/asipto/siremis üzerinden en sonra halini indirerek denemenizi öneririm.

bunlardan sonra siremiz altındaki install klasörünü silmeniz önerilmektedir.

Ember ve Phantom.js kurulumu

ember ve phantom un testini yapabilmek için öncelikle kurmalıyız tabiki 🙂

fcicek@cicek:~$  sudo npm install -g ember-cli 
/usr/local/bin/ember -> /usr/local/lib/node_modules/ember-cli/bin/ember
ember-cli@1.13.12 /usr/local/lib/node_modules/ember-cli
├── ember-cli-is-package-missing@1.0.0
├── ember-cli-path-utils@1.0.0
├── ember-cli-test-info@1.0.0
├── ember-cli-get-dependency-depth@1.0.0
├── ember-cli-string-utils@1.0.0
├── clean-base-url@1.0.0
├── ember-cli-normalize-entity-name@1.0.0
├── silent-error@1.0.0
├── amd-name-resolver@0.0.2
├── escape-string-regexp@1.0.3
├── fs-monitor-stack@1.1.0
├── pleasant-progress@1.1.0
├── is-git-url@0.2.3
├── isbinaryfile@2.0.4
├── ember-cli-copy-dereference@1.0.0
├── broccoli-source@1.1.0
├── exists-sync@0.0.3
├── promise-map-series@0.2.2
├── diff@1.4.0
├── node-modules-path@1.0.1
├── broccoli-viz@2.0.1
├── through@2.3.8
├── bower-endpoint-parser@0.2.2
├── walk-sync@0.1.3
├── broccoli-merge-trees@1.0.0
├── inflection@1.7.2
├── node-uuid@1.4.7
├── exit@0.1.2
├── semver@4.3.6
├── temp@0.8.1 (rimraf@2.2.8)
├── rsvp@3.1.0
├── resolve@1.1.6
├── git-repo-info@1.1.2
├── debug@2.2.0 (ms@0.7.1)
├── nopt@3.0.6 (abbrev@1.0.7)
├── symlink-or-copy@1.0.1 (copy-dereference@1.0.0)
├── broccoli-sane-watcher@1.1.4 (broccoli-slow-trees@1.1.0)
├── findup@0.1.5 (commander@2.1.0, colors@0.6.2)
├── quick-temp@0.1.3 (mktemp@0.3.5, rimraf@2.2.8, underscore.string@2.3.3)
├── merge-defaults@0.2.1 (lodash@2.4.2)
├── http-proxy@1.12.0 (eventemitter3@1.1.1, requires-port@0.0.1)
├── lodash@3.10.1
├── core-object@0.0.2 (lodash-node@2.4.1)
├── chalk@1.1.0 (supports-color@2.0.0, ansi-styles@2.1.0, strip-ansi@3.0.0, has-ansi@2.0.0)
├── leek@0.0.18
├── broccoli-kitchen-sink-helpers@0.2.9 (mkdirp@0.5.1)
├── portfinder@0.4.0 (async@0.9.0, mkdirp@0.5.1)
├── readline2@0.1.1 (mute-stream@0.0.4, strip-ansi@2.0.1)
├── configstore@1.2.1 (object-assign@3.0.0, os-tmpdir@1.0.1, graceful-fs@4.1.2, uuid@2.0.1, xdg-basedir@2.0.0, osenv@0.1.3, mkdirp@0.5.1, write-file-atomic@1.1.3)
├── minimatch@2.0.10 (brace-expansion@1.1.1)
├── glob@5.0.13 (path-is-absolute@1.0.0, inherits@2.0.1, once@1.3.2, inflight@1.0.4)
├── broccoli-config-replace@1.1.0 (broccoli-kitchen-sink-helpers@0.3.1, fs-extra@0.24.0)
├── morgan@1.6.1 (on-headers@1.0.1, basic-auth@1.0.3, depd@1.0.1, on-finished@2.3.0)
├── findup-sync@0.2.1 (glob@4.3.5)
├── broccoli-plugin@1.2.1 (rimraf@2.4.3)
├── cpr@0.4.2 (graceful-fs@4.1.2, mkdirp@0.5.1, rimraf@2.4.3)
├── compression@1.6.0 (bytes@2.1.0, on-headers@1.0.1, vary@1.1.0, compressible@2.0.6, accepts@1.3.0)
├── fs-extra@0.22.1 (jsonfile@2.2.3, graceful-fs@4.1.2, rimraf@2.4.3)
├── bower-config@0.6.1 (osenv@0.0.3, graceful-fs@2.0.3, mout@0.9.1, optimist@0.6.1)
├── broccoli-funnel@1.0.0 (array-equal@1.0.0, blank-object@1.0.1, path-posix@1.0.0, fs-tree-diff@0.3.1, fast-ordered-set@1.0.2, mkdirp@0.5.1, rimraf@2.4.3, walk-sync@0.2.6)
├── broccoli-config-loader@1.0.0 (broccoli-caching-writer@2.2.0)
├── markdown-it@4.3.0 (uc.micro@1.0.0, linkify-it@1.2.0, mdurl@1.0.1, entities@1.1.1, argparse@1.0.3)
├── npm@2.14.10
├── bower@1.6.5
├── ember-cli-preprocess-registry@1.1.0 (process-relative-require@1.0.0, broccoli-clean-css@0.2.0)
├── markdown-it-terminal@0.0.2 (ansi-styles@2.1.0, cli-table@0.3.1, lodash-node@3.10.1, cardinal@0.5.0)
├── yam@0.0.18 (fs-extra@0.16.5, lodash.merge@3.3.2)
├── ember-router-generator@1.1.1 (recast@0.9.18)
├── sane@1.3.0 (watch@0.10.0, minimist@1.2.0, minimatch@0.2.14, exec-sh@0.2.0, walker@1.0.7, fb-watchman@1.6.0)
├── express@4.13.3 (merge-descriptors@1.0.0, escape-html@1.0.2, cookie@0.1.3, utils-merge@1.0.0, array-flatten@1.1.1, cookie-signature@1.0.6, methods@1.1.1, vary@1.0.1, fresh@0.3.0, range-parser@1.0.3, content-type@1.0.1, path-to-regexp@0.1.7, parseurl@1.3.0, etag@1.7.0, serve-static@1.10.0, content-disposition@0.5.0, depd@1.0.1, qs@4.0.0, on-finished@2.3.0, accepts@1.2.13, type-is@1.6.9, proxy-addr@1.0.8, finalhandler@0.4.0, send@0.13.0)
├── tiny-lr@0.2.0 (parseurl@1.3.0, qs@5.1.0, livereload-js@2.2.2, body-parser@1.14.1, faye-websocket@0.10.0)
├── broccoli@0.16.8 (broccoli-slow-trees@1.1.0, copy-dereference@1.0.0, mime@1.3.4, rimraf@2.4.3, commander@2.9.0, connect@3.4.0, handlebars@3.0.3)
├── broccoli-sourcemap-concat@2.0.2 (mkdirp@0.5.1, lodash-node@2.4.1, broccoli-caching-writer@2.2.0, lodash.uniq@3.2.2, fast-sourcemap-concat@0.2.6)
├── inquirer@0.5.1 (mute-stream@0.0.4, async@0.8.0, lodash@2.4.2, chalk@0.4.0, cli-color@0.3.3)
├── testem@0.9.10 (growl@1.8.1, styled_string@0.0.1, did_it_work@0.0.6, printf@0.2.3, fileset@0.2.1, charm@1.0.0, xmldom@0.1.19, mustache@2.2.0, async@1.5.0, mkdirp@0.5.1, rimraf@2.4.3, commander@2.9.0, backbone@1.2.3, consolidate@0.13.1, fireworm@0.6.6, js-yaml@3.4.3, tap-parser@1.2.2, cross-spawn-async@2.0.0, npmlog@1.2.1, socket.io-pure@1.3.11)
└── broccoli-babel-transpiler@5.5.0 (clone@0.2.0, json-stable-stringify@1.0.0, broccoli-persistent-filter@1.1.6, babel-core@5.8.34)
fcicek@cicek:~$ sudo npm install -g phantomjs
/usr/local/bin/phantomjs -> /usr/local/lib/node_modules/phantomjs/bin/phantomjs

> phantomjs@1.9.18 install /usr/local/lib/node_modules/phantomjs
> node install.js

Looks like an `npm install -g`; unable to check for already installed version.
Downloading https://bitbucket.org/ariya/phantomjs/downloads/phantomjs-1.9.8-linux-x86_64.tar.bz2
Saving to /usr/local/lib/node_modules/phantomjs/phantomjs/phantomjs-1.9.8-linux-x86_64.tar.bz2
Receiving...
  [======================================--] 94% 0.0s
Received 12854K total.
Extracting tar contents (via spawned process)
Removing /usr/local/lib/node_modules/phantomjs/lib/phantom
Copying extracted folder /usr/local/lib/node_modules/phantomjs/phantomjs/phantomjs-1.9.8-linux-x86_64.tar.bz2-extract-1447627359889/phantomjs-1.9.8-linux-x86_64 -> /usr/local/lib/node_modules/phantomjs/lib/phantom
Writing location.js file
Done. Phantomjs binary available at /usr/local/lib/node_modules/phantomjs/lib/phantom/bin/phantomjs
phantomjs@1.9.18 /usr/local/lib/node_modules/phantomjs
├── which@1.0.9
├── progress@1.1.8
├── kew@0.4.0
├── adm-zip@0.4.4
├── request-progress@0.3.1 (throttleit@0.0.2)
├── npmconf@2.1.1 (uid-number@0.0.5, ini@1.3.4, inherits@2.0.1, semver@4.3.6, osenv@0.1.3, once@1.3.2, nopt@3.0.6, config-chain@1.1.9, mkdirp@0.5.1)
├── fs-extra@0.23.1 (path-is-absolute@1.0.0, jsonfile@2.2.3, graceful-fs@4.1.2, rimraf@2.4.3)
└── request@2.42.0 (caseless@0.6.0, forever-agent@0.5.2, aws-sign2@0.5.0, oauth-sign@0.4.0, stringstream@0.0.5, tunnel-agent@0.4.1, json-stringify-safe@5.0.1, qs@1.2.2, node-uuid@1.4.7, mime-types@1.0.2, tough-cookie@2.2.1, http-signature@0.10.1, form-data@0.1.4, bl@0.9.4, hawk@1.1.1)
fcicek@cicek:~$ ember -v
DEPRECATION: Node v0.10.25 is no longer supported by Ember CLI. Please update to a more recent version of Node
undefined
version: 1.13.12
Could not find watchman, falling back to NodeWatcher for file system events.
Visit http://www.ember-cli.com/user-guide/#watchman for more info.
node: 0.10.25
npm: 2.14.10
os: linux x64
fcicek@cicek:~$ 

vagrant : giriş seviyesi

kendi sitesinde vagrant

“Vagrant is a tool for building complete development environments. With an easy-to-use workflow and focus on automation, Vagrant lowers development environment setup time, increases development/production parity, and makes the “works on my machine” excuse a relic of the past.”

şeklinde ifade edilmekte. ne işe yarar derseniz : yazılım ekibinizde yer alan geliştiriciler farklı platormlar kullanıyorsa geliştiricilere ilave bir iş yükü getirmeden yazılımın çalışacağı platforma sahip olmalarına ve yönetmelerine yardımcı olan bir araçtır. kendi başına bir sanallaştırma ortamı felan değildir.

ilk çıktığı zamanlar kurulum için biraz uğraşmak gerekiyordu. ancak artık rahatlıkla kurulum gerçekleştirilebiliyor. hızlıca kurulumu nasıl yapılır değinelim..

öncelikle eğer sisteminizde yoksa

fcicek@cicek:~$ sudo apt-get install virtualbox

virtualboxı kurmamız gerekmektedir. sonrasında vagrant

fcicek@cicek:~$ sudo apt-get install vagrant virtualbox-dkms
[sudo] password for fcicek: 
Paket listeleri okunuyor... Bitti
Bağımlılık ağacı oluşturuluyor       
Durum bilgisi okunuyor... Bitti      
Aşağıdaki ek paketler de kurulacak:
  bsdtar bundler ruby-celluloid ruby-childprocess ruby-erubis ruby-ffi ruby-i18n ruby-listen ruby-log4r
  ruby-net-http-persistent ruby-net-scp ruby-net-ssh ruby-nokogiri ruby-rb-inotify ruby-thor ruby-timers
Önerilen paketler:
  bsdcpio
Aşağıdaki YENİ paketler kurulacak:
  bsdtar bundler ruby-celluloid ruby-childprocess ruby-erubis ruby-ffi ruby-i18n ruby-listen ruby-log4r
  ruby-net-http-persistent ruby-net-scp ruby-net-ssh ruby-nokogiri ruby-rb-inotify ruby-thor ruby-timers vagrant
0 paket yükseltilecek, 17 yeni paket kurulacak, 0 paket kaldırılacak ve 2 paket yükseltilmeyecek.
1.090 kB arşiv dosyası indirilecek.
Bu işlem tamamlandıktan sonra 7.459 kB ek disk alanı kullanılacak.
Devam etmek istiyor musunuz? [E/h] E

bağlantılı ve gerekli tüm paketler kurulacaktır. vagrant kutu mantığı ile çalışmaktadır.

https://app.vagrantup.com/boxes/search adresindeki hazır boxlardan birini kullanabilirsiniz.

vagrant_atlas

ben bu örnekte precise32 kullanacağım. test için kullanacağımız bu box indirilmesini ve kütüphanemize eklenmesini gerçekleştirelim..

fcicek@cicek:~$ vagrant box add precise32 http://files.vagrantup.com/precise32.box
==> box: Adding box 'precise32' (v0) for provider: 
    box: Downloading: http://files.vagrantup.com/precise32.box
==> box: Successfully added box 'precise32' (v0) for 'virtualbox'!

şimdi sonraki adıma geçebiliriz. projemiz dosyalarının yer alacacağı bir klasör oluşturarak klasör içine girelim.

fcicek@cicek:~$ mkdir vagrant_project
fcicek@cicek:~$ cd vagrant_project/

“vagrant init” komutunu çalıştırarak “Vagrantfile” default konfigürasyon dosyasının oluşturulmasını sağlayalım.

fcicek@cicek:~/vagrant_project$ vagrant init
A `Vagrantfile` has been placed in this directory. You are now
ready to `vagrant up` your first virtual environment! Please read
the comments in the Vagrantfile as well as documentation on
`vagrantup.com` for more information on using Vagrant.
fcicek@cicek:~/vagrant_project$ ls
Vagrantfile

sonrasında “Vagrantfile” dosyasında

fcicek@cicek:~/vagrant_project$ nano Vagrantfile 

  # Every Vagrant virtual environment requires a box to build off of.
  config.vm.box = "base"

  # Every Vagrant virtual environment requires a box to build off of.
  config.vm.box = "precise32"

olacak şekilde gerekli değişikliği yaparak vagrantı çalıştıralım.

fcicek@cicek:~/vagrant_project$ vagrant up
Bringing machine 'default' up with 'virtualbox' provider...
==> default: Importing base box 'precise32'...
==> default: Matching MAC address for NAT networking...
==> default: Setting the name of the VM: vagrant_project_default_1439666566656_16370
==> default: Clearing any previously set network interfaces...
==> default: Preparing network interfaces based on configuration...
    default: Adapter 1: nat
==> default: Forwarding ports...
    default: 22 => 2222 (adapter 1)
==> default: Booting VM...
==> default: Waiting for machine to boot. This may take a few minutes...
    default: SSH address: 127.0.0.1:2222
    default: SSH username: vagrant
    default: SSH auth method: private key
    default: Warning: Connection timeout. Retrying...
==> default: Machine booted and ready!
==> default: Checking for guest additions in VM...
    default: The guest additions on this VM do not match the installed version of
    default: VirtualBox! In most cases this is fine, but in rare cases it can
    default: prevent things such as shared folders from working properly. If you see
    default: shared folder errors, please make sure the guest additions within the
    default: virtual machine match the version of VirtualBox you have installed on
    default: your host and reload your VM.
    default: 
    default: Guest Additions Version: 4.2.0
    default: VirtualBox Version: 4.3
==> default: Mounting shared folders...
    default: /vagrant => /home/fcicek/vagrant_project

vagrantımız başladı. durum kontrolünü yapmak istersek

fcicek@cicek:~/vagrant_project$ vagrant status
Current machine states:

default                   running (virtualbox)

The VM is running. To stop this VM, you can run `vagrant halt` to
shut it down forcefully, or you can run `vagrant suspend` to simply
suspend the virtual machine. In either case, to restart it again,
simply run `vagrant up`.
fcicek@cicek:~/vagrant_project$ 

virtual box ı açacak olursa yeni bir sanal makine oluşturulduğu başlamış olduğu görülmektedir.

vafrant_vm

şimdi sanal makinemize bağlanalım

fcicek@cicek:~/vagrant_project$ vagrant ssh
Welcome to Ubuntu 12.04 LTS (GNU/Linux 3.2.0-23-generic-pae i686)

 * Documentation:  https://help.ubuntu.com/
New release '14.04.3 LTS' available.
Run 'do-release-upgrade' to upgrade to it.

Welcome to your Vagrant-built virtual machine.
Last login: Fri Sep 14 06:22:31 2012 from 10.0.2.2
vagrant@precise32:~$ 

her şey yolunda görülüyor gerçekten öylemi son bir iki ufak kontrol daha yapalım.

vagrant@precise32:~$ uname -a
Linux precise32 3.2.0-23-generic-pae #36-Ubuntu SMP Tue Apr 10 22:19:09 UTC 2012 i686 i686 i386 GNU/Linux
vagrant@precise32:~$ ping google.com
PING google.com (216.58.209.14) 56(84) bytes of data.
64 bytes from sof01s12-in-f14.1e100.net (216.58.209.14): icmp_req=1 ttl=63 time=48.5 ms
64 bytes from sof01s12-in-f14.1e100.net (216.58.209.14): icmp_req=2 ttl=63 time=47.7 ms

bu yazı ile vagranta giriş yapmış olduk. bir sonraki yazıda daha detaylı konulara değineceğiz.

Back To Top